Solar Panel
Solar Panels generate FE from daylight with no fuel at all. Place one under open sky and it charges whatever is next to it. Once you have a few, a Solar Array Controller gathers a connected field of panels into one output with a shared buffer and its own bonuses. See Power Chains for how panels fit beside the main generators.
Each panel is a low tracker on a short post: a deck of cells on a torque tube. While it generates, the deck tilts toward the sun and follows it across the sky, east in the morning and west in the afternoon. When it can't generate it lies flat, so you can tell at a glance which panels are working. Panels are a little over a third of a block tall, so you can walk across a field of them.
Each panel and controller you craft rolls its own rarity and affixes. Solar blocks do not have Machine Mastery.
Obtaining
Crafting
Upgraded panels use a  Solar Panel Frame instead of the previous panel, so a well-rolled lower panel stays useful rather than being crafted away.
| Ingredients | Crafting recipe | Notes |
|---|---|---|
| Crude Solar Panel Glass Pane + Redstone Dust + Basic Electric Circuit + Iron Plate + Cable |      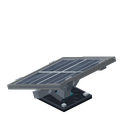 | |
| Copper Solar Panel Glass Pane + Copper Coil + Redstone Dust + Solar Panel Frame + Copper Plate + Copper Energy Connector |    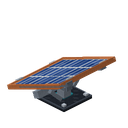 | Requires the Copper material to be enabled. |
| Gold Solar Panel Glass Pane + Gold Coil + Redstone Dust + Solar Panel Frame + Gold Plate + Basic Electric Circuit |    | Requires the Gold material to be enabled. |
| Sparksteel Solar Panel Glass Pane + Sparksteel Coil + Redstone Dust + Solar Panel Frame + Sparksteel Plate + Advanced Electric Circuit |    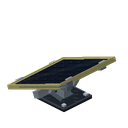 | Requires the Sparksteel material to be enabled. |
| Solar Array Controller Steel Plate + Steel Casing + Copper Solar Panel + Advanced Electric Circuit + Redstone Dust + Energy Coil |    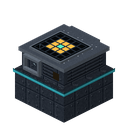 | Requires the Steel material to be enabled. |
| Sparksteel Solar Array Extender Sparksteel Plate + Control Board + Sparksteel Coil |   | |
| Aethergold Solar Array Extender Aethergold Plate + Control Board + Aethergold Coil |    |
| Ingredients | Crafting recipe | Notes |
|---|---|---|
| Glass Pane + Redstone Dust + Machine Frame + Iron Plate + Cable |  | Requires the Iron material to be enabled. |
Breaking
Mine panels and the controller with a pickaxe. They drop themselves and keep their rolled traits. A broken controller also drops its installed Gear.
Usage
Generating power
A panel generates FE only when all of these are true:
- It is daytime.
- The block above the panel can see the sky. Transparent blocks that keep sky visibility are fine.
- You are in the Overworld. Other dimensions are disabled by default in the common config.
Rain, snow, and thunderstorms drop a panel to its lower weather output. At night or under a roof it makes nothing. Anything above a panel blocks it, including another panel, even with a gap between them.
A standalone panel stores FE in a small internal buffer and pushes it out to adjacent blocks that accept FE, such as a Universal Cable or a Battery Chassis. A panel does not limit its own output, so the receiver or connector tier decides how much FE moves each tick. Panels never accept FE from outside.
The cable port sits under the foot of the post. A cable directly below plugs in, so you can run cables one block down under a field or raise panels on a column of cable. A cable beside a panel connects too.
A standalone panel with a full buffer has nowhere to send its FE, so it stops and lies flat until something takes the FE.
Stages
| Stage | Block | Clear day | Weather | Buffer |
|---|---|---|---|---|
| 1 | Crude Solar Panel |
4 FE/t | 1 FE/t | 256 FE |
| 2 | Copper Solar Panel |
8 FE/t | 2 FE/t | 512 FE |
| 3 | Gold Solar Panel |
12 FE/t | 3 FE/t | 512 FE |
| 4 | Solar Array Controller |
Sum of its panels | Sum of its panels | 512 FE plus Battery Cell |
| 5 | Sparksteel Solar Panel |
20 FE/t | 7 FE/t | 1,024 FE |
Panels can roll the Peak Solar suffix, which boosts that panel's output by 50–100% during the midday window (Minecraft time 4000 to 8000).
Solar Array Controller
Place the controller on the same level as your panels. Every 20 ticks it scans a square around itself and takes over every panel that connects back to it through adjacent panels. Panels inside the square that are not connected to the rest are ignored.
| Range | Area | Max panels |
|---|---|---|
| 1 | 3×3 around the controller | 8 |
| 2 | 5×5 around the controller | 24 |
The controller starts at range 1. Range rolls on the controller and an installed Solar Array Extender raise it, up to a maximum of 2.
While a controller owns a panel, that panel stops exporting on its own. The controller adds up its panels' output, applies its own stats once to the total, stores the FE, and exports it to adjacent blocks. Its cable port is on the underside of its base. A few more rules:
- Set bonus. If every panel spot in range holds a panel of the same stage, the array gets +20% output.
- Overlap. A panel inside two controllers' ranges splits its output between them.
- No output cap. Like a standalone panel, the controller does not limit its own output, so the receiver or connector tier decides how much FE moves each tick.
The Process tab has a button that toggles an in-world outline of the controller's range. The outline stays visible after you close the screen.
The controller shows the state of its array without opening the screen:
- Array map. The display on top has one light for each panel spot in range, laid out like the field with north at the top. The controller's own spot is mint. A panel it owns is amber while it generates in sunlight, pale blue while it generates in moonlight, and dim when it isn't generating. An empty spot is dark.
- Battery bay. An installed Battery Cell shows behind the glass on the front.
- Extender. An installed Solar Array Extender sits on the bracket at the back.
- Status lamp. The lamp on the front lights while the array generates.
A controller that converts moonlight (Moonlit Conversion, Lunar Inverter, or the Aethergold extender) keeps its panels tracking at night, following the moon.
Controller affixes
Besides the usual generator stats, a controller can roll these array affixes. Their values show on the Stats tab under the stat name.
| Affix | Stat | Effect |
|---|---|---|
| Array Expansion | Array Range | +1 or +2 range, still capped at 2. |
| Moonlit Conversion | Moonlight Conversion | The array keeps generating at night, at 10–55% of its clear-day output depending on tier. |
| Lunar Inverter | Lunar Inversion | Stronger night generation, 30–85% of clear-day output, but clear-day output drops by 15%. Cannot roll alongside Moonlit Conversion. |
| Cloud Piercer | Weather Recovery | Recovers 10–60% of the gap between weather output and clear-day output. Stability above 1.0 also helps. Recovery is capped at 85% of the gap. |
| Clear-Sky Amplifier | Clear Sky Amplification | Boosts clear-day output by 5–50%. |
| Panel Synchronizer | Panel Synchronization | Boosts output by 5–50% when every panel in the array is the same material and at least two are generating. |
| Panel Arbitration | Panel Arbitration | Collects the highest-output panels first instead of the nearest. |
Gear
Panels have no Gear and no screen. The controller's Gear tab has two optional slots:
- Battery Cell: extra storage and smoother output.
- Solar Array Extender: adds +1 range.
| Extender | Built-in bonus |
|---|---|
| Sparksteel Solar Array Extender |
+20% Clear Sky Amplification |
| Aethergold Solar Array Extender |
+20% Moonlight Conversion, so the array generates at night |
Extenders also roll their own affixes, which apply while installed.
Automation
| Block | Behavior |
|---|---|
| Solar Panel | Exports FE on every side. The cable port is under its foot. Does not accept FE or items. |
| Solar Array Controller | Exports FE on every side. The cable port is under its base. Does not accept FE. Gear is installed by hand. |
If a very large field slows your game down, turn off animated solar panels in RNGTech's client config. Panels then tilt in steps instead of turning smoothly.
Screen
Panels have no screen. The Solar Array Controller screen has four tabs:
- Process: stored FE, current FE/t, active and blocked panel counts, daylight and weather state, and the range-outline button. Hover for exact values.
- Gear: Battery Cell and Solar Array Extender slots.
- Stats: the controller's current stats, including traits and Gear.
- Refinement: refine the placed controller's traits with a catalyst.
Data values
| Name | Resource location | Form | Translation key |
|---|---|---|---|
| Crude Solar Panel | rngtech:crude_solar_panel | Block | block.rngtech.crude_solar_panel |
| Copper Solar Panel | rngtech:copper_solar_panel | Block | block.rngtech.copper_solar_panel |
| Gold Solar Panel | rngtech:gold_solar_panel | Block | block.rngtech.gold_solar_panel |
| Sparksteel Solar Panel | rngtech:sparksteel_solar_panel | Block | block.rngtech.sparksteel_solar_panel |
| Solar Array Controller | rngtech:solar_array_controller | Block | block.rngtech.solar_array_controller |
| Sparksteel Solar Array Extender | rngtech:sparksteel_solar_array_extender | Item | item.rngtech.sparksteel_solar_array_extender |
| Aethergold Solar Array Extender | rngtech:aethergold_solar_array_extender | Item | item.rngtech.aethergold_solar_array_extender |
See also
- Battery Chassis, for storing daytime power for the night.
- Machine Stats
RNGTech wiki
| Guides |  Automation ·  Battery Cells ·  Dormant Machines ·  Gear ·  Getting Started ·  Heat ·  Machine Mastery · Machine Stats ·  Modpack Creators ·  Power Chains ·  Rarity and Affixes ·  Stages ·  Uniques |
|---|---|
| Processing |  Alloy Furnace ·  Component Assembler ·  Component Recycler ·  Crusher ·  Furnace ·  Melter ·  Metal Press ·  Resonance Calibrator ·  Wooden Composter |
| Power generation |  Bio Generator ·  Cavitation Generator ·  Corrosion Cell ·  Fuel Cell ·  Potential Reactor · Solar Panel ·  Solid Fuel Burner · Syngas Combustor ·  Vacuum Collapse Generator |
| Energy storage |  Battery Chassis |
| Fluids and gases |  Algae Photobioreactor ·  Ammonia Synthesizer ·  Coal Gasifier ·  Fluid and Compressor Tanks ·  Silica Gel Dehumidifier ·  Steam Methane Reformer ·  Wooden Dehumidifier |
| Refinement |  Affix Forge ·  Exotic Affix Forge |
| Logistics | Universal Cable |
| Tools |  Forestry Cart Station ·  Miner's Companion ·  Modular Tools ·  Tool Bench |